Share

A whole new world of drawing in VR - a world as challenging and intimidating as a once felt drawing.
Fortunately, I believe that the same stable search can bring me to a new level in VR as I work hard in an artistic field.
For anyone curious about making things in VR, this post will give you a sense of what to expect, the hurdles you may encounter,
and the fun you can have.
Day 1: Getting started
Okay, it’s hard. And it’s almost nothing like drawing with a real brush (no matter what the ad says). The definitive difference is that there’s a whole dimension added to your brush strokes, so you are constantly falling into open space while trying to make what used to be a simple line on a paper. This poses a technical challenge, but as you figure it out, it opens the opportunity to instantly create lots of cool “dimensional” animations using different brushes.
Let’s review some of the fundamentals:
Uploading a reference image
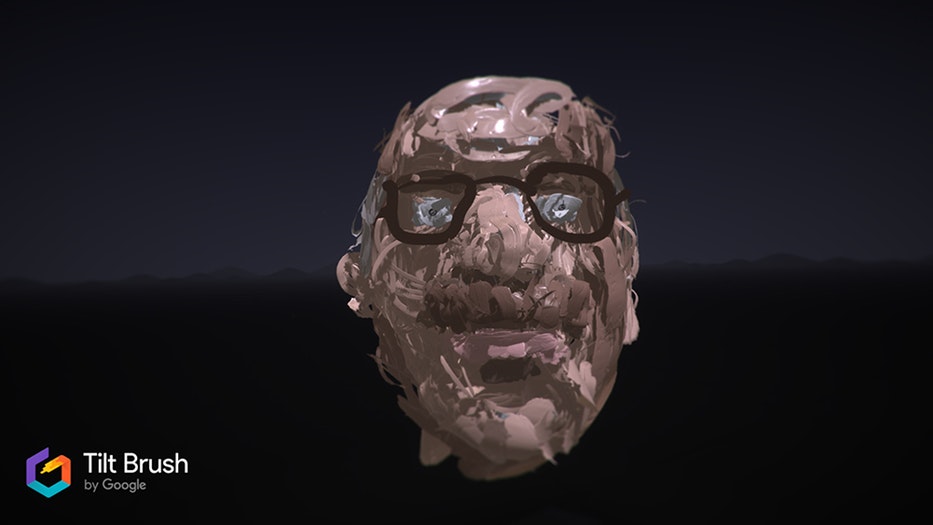
My first step was to figure out how to put a photo of David Kelley into my VR bubble for use as a reference image. This can be done pretty easily within the Settings panel (gear icon) / Labs panel (flask icon) / Reference Images. That would be the first fundamental thing for bringing any graphical reference into your personal VR drawing lab.
Choosing a brush
After trying them all, I settled on a simple wire brush. I recommend it as a first step on the ladder of your immersive experience because in comparison to calligraphic and wide-angle brushes (not to mention special effect and animation brushes), it offers even sides and predictable behavior.
Using three-dimensional guides
As I mentioned before (and as you can see from the portrait progress so far), it’s quite unusual to think within the 3D space while drawing, so the first handy tool I discovered was guides. If you came from a graphic or web design background, as I did, you’ll instantly notice that nasty extra dimension added to them as well. A good way to start here would be to compose your portrait (or whatever you want to draw) as a set of shapes, similar to how you’d be taught in a classical art class, and then adjust them until it feels done.
Day 2: Getting better
The second day started with an attempt to combine multiple shapes (using guides) into what would resemble a human silhouette. I decided to get away from Kelley portraits for a moment and gain general confidence in drawing in VR by fooling around and building “robots.”
Simply put, you stack a couple of 3D guides on top of each other and paint over them, like I explained above. It was easier than I’d thought it would be, so after spending about an hour assembling those statues, I switched back to Kelley and here’s what I’ve got.
Day 3: Drawing without guides
Day 3 started with an attempt to break free from floating yellow bubbles and get a little bit more real. I browsed Google Poly Gallery for some inspiration and came back with the above. It still looked far from good, but I finally felt some progress in terms of confidence and drawing without guides. The next challenge was to learn how to properly fill my surfaces without creating a total mess.
I hope the following sequence of GIFs shows some progress:
Day 4: Finding new applications
Since there was only one day left before the conclusion of my little experiment, I decided to try out more brushes than just the “wired” one, and I must say, renderings of those were executed really well within Tilt Brush. My doodles instantly got more texture, depth, and light reflections without any additional settings on my side.
VIA : IDEO


